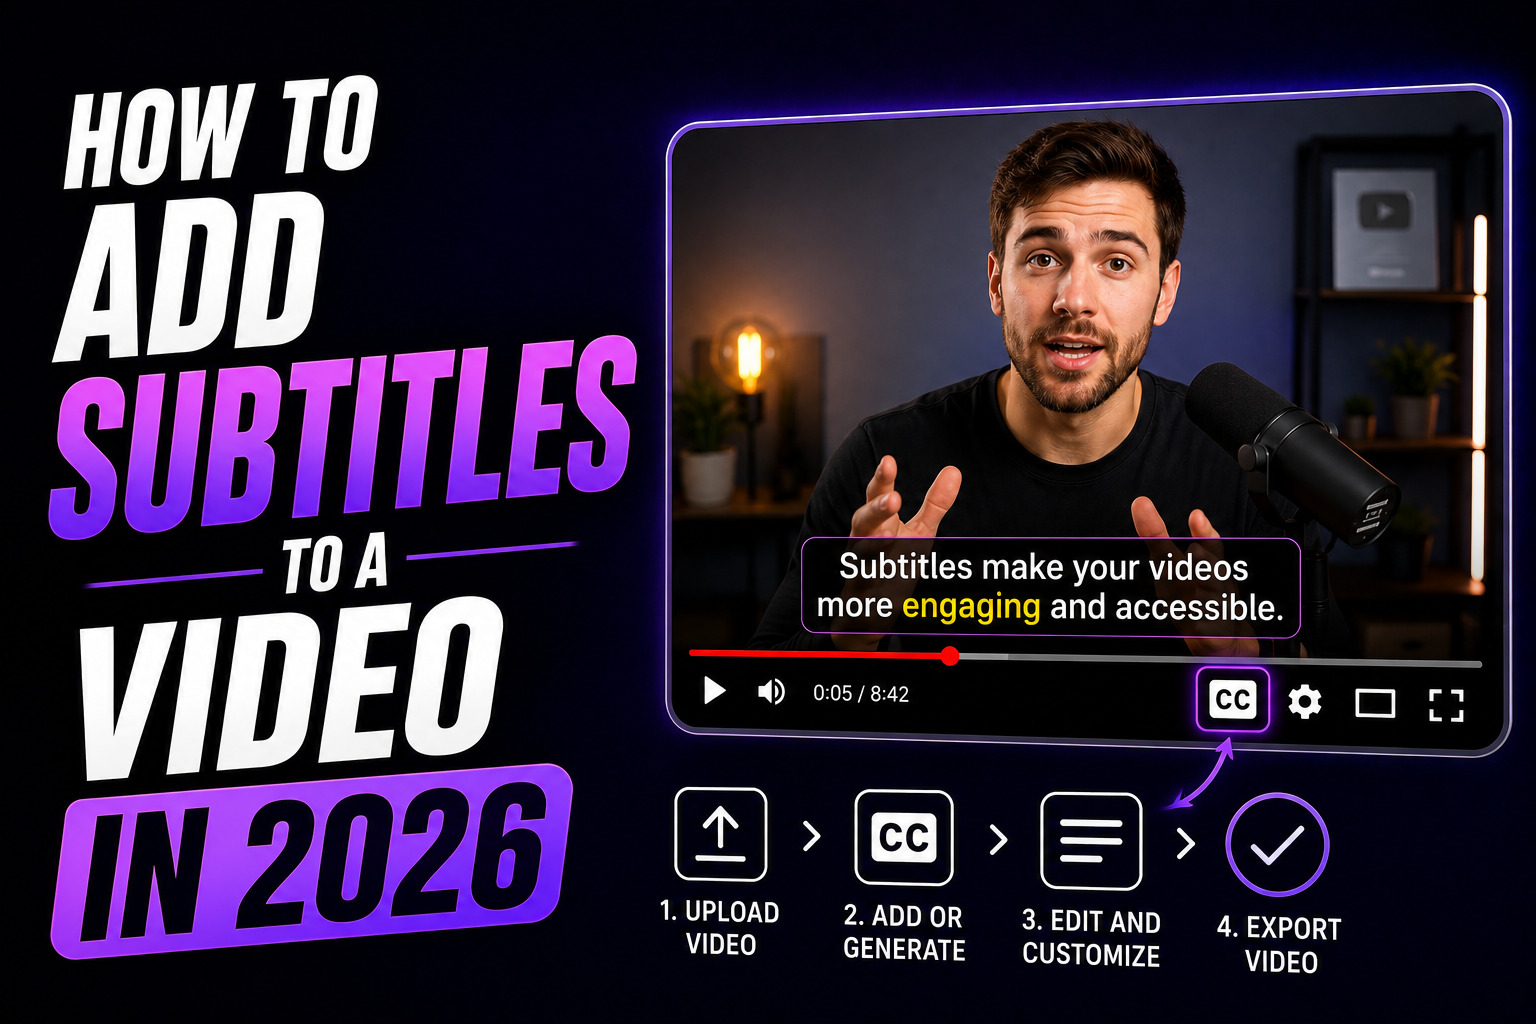
How to Add Subtitles to a Video in 2026
Adding subtitles to a video used to mean typing every word by hand, syncing each line to the audio frame by frame, and exporting an SRT file that might or might not display correctly on the platform you uploaded to. That workflow took 15 to 30 minutes per video and nobody enjoyed it.
In 2026, AI does it in seconds. Upload your video, click one button, and you get a full transcription with word-level timestamps. From there, you style, chunk, and export. The entire process takes under 5 minutes for a single video.
But the method you use matters. Some approaches produce basic auto-text that looks generic and adds nothing to engagement. Other approaches produce styled, professional captions that actually improve watch time and retention. This guide covers both so you can pick the right one for your workflow.
What this guide covers:
- Why subtitles are no longer optional in 2026
- 4 methods to add subtitles (ranked by speed and quality)
- Step-by-step AI captioning workflow
- How to style subtitles for professional results
- Platform-specific subtitle tips for Reels, Shorts, and TikTok
- Best tools for adding subtitles in 2026
1. Why Subtitles Are No Longer Optional
The data in 2026 is clear. Subtitles are not an add-on feature. They are a requirement for reaching your audience.
- 80% of viewers are more likely to watch a video to completion when captions are available
- Over 80% of social media videos are watched without sound
- 70% of US viewers now watch video with captions turned on, even when audio is available
- Captioned video ads increase view time by 12% on average compared to uncaptioned versions
- Algorithms on TikTok, Instagram, and YouTube all treat caption presence as a quality signal that influences distribution
A video without subtitles in 2026 is a video that is invisible to most of its potential audience. Every uncaptioned reel, short, or TikTok is leaving reach, engagement, and revenue on the table.
2. Four Methods to Add Subtitles (Ranked)
Not all subtitle methods produce the same result. Here is how the four main approaches compare on speed, quality, and control.
| Method | Speed | Styling Control | Output Quality | Best For |
|---|---|---|---|---|
| 1. Dedicated AI captioning tool | Very fast | Full (word-level) | Professional | Creators who want styled, branded captions |
| 2. Built-in platform auto-captions | Fast | None | Basic | Quick posts where styling does not matter |
| 3. Video editor auto-captions (CapCut, Premiere, Resolve) | Medium | Moderate | Good | Creators already working in a timeline editor |
| 4. Manual typing and SRT upload | Very slow | Full | Depends on effort | Specific use cases (translations, legal accuracy) |
Method 1 (dedicated AI captioning tool) is the approach this guide focuses on because it produces the best combination of speed and quality. Methods 2 and 3 are covered below for context. Method 4 is only worth the time in rare cases where absolute control over every word is required.
3. Method 1: Dedicated AI Captioning Tool (Recommended)
This is the method I use on every video. A dedicated captioning tool does one job and does it at a level that general-purpose editors cannot match: fast AI transcription with deep styling control.
Step-by-Step Process
- Upload your video. Drag and drop into the tool. No installation, no timeline setup. Most AI captioning tools are browser-based.
- Generate AI subtitles. The tool transcribes the audio in seconds. Accuracy is 95%+ for clear audio across most languages and accents.
- Review the transcription. Scan for errors in names, technical terms, and industry-specific words. Fix anything the AI missed. This takes 1 to 2 minutes for a 30-second video.
- Break text into short chunks. Split every caption line into 3 to 5 word segments. This is the step that separates default-looking captions from professional ones. Long sentence blocks look auto-generated. Short chunks look intentional.
- Highlight keywords. Pick one word per chunk that carries the meaning. Apply a contrasting color, bold weight, or background highlight. This creates visual hierarchy that guides the viewer's eye.
- Set the hook caption. Replace the auto-generated first line with a scroll-stopping statement. The first caption is the most important one for silent viewers.
- Apply your style template. If you have a saved template (font, color, highlight style, placement), apply it. If this is your first video, build the template now and save it for every future video.
- Sync timing. Watch the video once and adjust any captions that appear before or after the spoken word. Timing should match speech rhythm, not just audio timestamps.
- Export with hardcoded subtitles. Render the video with captions burned in. This ensures they display correctly on every platform and device without relying on platform-generated captions.
Total time: 4 to 7 minutes per video. For batch processing 20+ videos, the full system is in How to Edit 30 Videos a Week Without Burning Out.
4. Method 2: Built-in Platform Auto-Captions
Instagram, TikTok, and YouTube all offer auto-generated captions that viewers can toggle on. These are the easiest subtitles to "add" because they require zero effort from the creator.
The problem: you have no control over how they look. Platform auto-captions use default fonts, default sizes, default placement, and default timing. They look the same on your video as they do on every other video in the feed. There is no branding, no keyword emphasis, no visual hierarchy.
When platform auto-captions are enough:
- Quick, informal posts where visual polish does not matter
- Stories and ephemeral content that disappears in 24 hours
- As a backup layer alongside hardcoded captions (some viewers prefer toggling captions on/off)
When they are not enough:
- Any content where engagement matters (reels, shorts, TikToks, ads)
- Brand content that requires consistent visual identity
- Any video where the captions ARE the message for silent viewers (80%+ of your audience)
For a deeper look at why default captions do not improve performance, see Why Most Video Captions Don't Increase Views.
5. Method 3: Video Editor Auto-Captions
Tools like CapCut, Premiere Pro, and DaVinci Resolve now include built-in auto-captioning features. These are a step up from platform auto-captions because you can edit the text and adjust some styling within the editor.
The trade-off is time. Working with captions inside a timeline editor means navigating the full editing interface just to adjust text. For creators who are already editing in these tools, it is convenient. For creators who want fast, styled captions without opening a full editor, a dedicated captioning tool is faster.
| Editor | Auto-Caption Quality | Styling Options | Word-Level Highlights |
|---|---|---|---|
| CapCut | Good | Templates + custom styling | Limited |
| Premiere Pro | Good | Full customization via Essential Graphics | Requires manual work |
| DaVinci Resolve | Good | Inspector-based customization | Requires manual work |
The recommended character limit for readability is 32 to 42 characters per line in any editor. If your captions exceed this, they need to be split into shorter chunks.
6. How to Style Subtitles for Professional Results
Generating subtitles is step one. Styling them is what makes the difference between auto-generated-looking text and captions that look like a professional editor produced them.
The 5 styling decisions that matter most:
| Decision | Default (Amateur) | Styled (Professional) |
|---|---|---|
| Words per line | 8 to 15 (full sentences) | 3 to 5 (short chunks) |
| Keyword emphasis | None (all words same style) | One keyword highlighted per chunk |
| Font | Default system font (Arial) | Premium sans-serif (Montserrat, Poppins) |
| Background | None (text floats over video) | Semi-transparent bar or text shadow |
| First line | Auto-transcription of opening words | Hook caption designed to stop the scroll |
These five decisions take about 3 minutes to implement per video. They are the difference between captions that viewers ignore and captions that improve watch time. The full styling guide is in Best Caption Styles That Increase Video Retention and Engagement, and the detailed breakdown of why defaults fail is in Why Auto Captions Look Bad.
7. Platform-Specific Subtitle Tips
| Platform | Key Consideration | Recommended Style |
|---|---|---|
| Instagram Reels | DM shares and saves are top signals. Fast-scroll feed. First caption must hook instantly. | Bold contrast hook, chunked body with highlights |
| YouTube Shorts | Watch time in seconds is the primary ranking signal. Longer Shorts (40+ seconds) perform better. | Word-by-word or minimal clean to reduce fatigue |
| TikTok | Audience expects polished captions. Caption presence is a quality signal for the algorithm. | Bold text, keyword highlights, animated entry |
| LinkedIn Video | Professional audience. Readability and clarity over flashy styling. | Minimal clean with semi-transparent background |
| Facebook Reels | Older demographic skews toward sound-off viewing. Readability is critical. | Large text, high contrast, simple animations |
Safe zones matter. Every platform has UI elements (buttons, usernames, description text) that overlap parts of the screen. Captions placed outside the safe zone get partially hidden. Center placement (vertically and horizontally) works on most platforms. Always preview on a phone before publishing.
8. Best Tools for Adding Subtitles in 2026
| Tool | Best For | AI Accuracy | Word-Level Styling | Pricing |
|---|---|---|---|---|
| RenderCut | Styled captions with deep control | High | Yes (best-in-class) | Free / $49 lifetime |
| CapCut | General editing + basic captions | Good | Limited | Free / $7.99 to $19.99/mo |
| VEED | Browser-based editing + captions | High (99%+ claimed) | Limited | $12 to $24/mo |
| Submagic | Auto-edit with captions + B-roll | Very high | Yes | $14 to $41/mo |
| Premiere Pro | Professional editors already in Adobe | Good | Manual only | $22.99/mo (Adobe plan) |
If subtitles are your primary need (not full video editing), a dedicated captioning tool saves time over general-purpose editors. The full tool comparison is in Best CapCut Alternatives for Auto Captions.
9. Hardcoded vs Soft Subtitles: Which to Use
This is a common question and the answer depends on where you are publishing.
| Type | What It Means | Best For |
|---|---|---|
| Hardcoded (burned in) | Captions are permanently part of the video file. Cannot be toggled off. | Instagram Reels, TikTok, YouTube Shorts, ads, any social media |
| Soft (SRT/VTT sidecar) | Captions are a separate file. Viewer can toggle on/off. | YouTube long-form, web players, accessibility compliance |
For short-form video, hardcoded is the standard. You want every viewer to see the captions regardless of their settings. For long-form YouTube content, upload an SRT file alongside the video so viewers can toggle captions based on preference.
Most AI captioning tools export both formats. Generate hardcoded for social media and SRT/VTT for YouTube long-form from the same transcription.
Frequently Asked Questions
How do I add subtitles to a video automatically?
Upload your video to an AI captioning tool. The AI transcribes the audio and generates timed subtitles in seconds. Review for accuracy, style the captions (chunk text, highlight keywords, choose font), and export with hardcoded subtitles. The full process takes 4 to 7 minutes per video.
What is the best free subtitle generator?
For basic auto-captions, platform tools (Instagram, TikTok, YouTube) are free but offer no styling control. For styled captions with a free tier, RenderCut offers 5 free videos with no watermark. CapCut's free plan includes auto-captioning with basic styling. VEED's free plan includes a watermark on exports.
Should I burn subtitles into the video or use SRT files?
For social media (Reels, Shorts, TikTok), burn subtitles into the video so every viewer sees them regardless of settings. For YouTube long-form, upload an SRT file alongside the video to give viewers the option to toggle captions on or off.
How do I make my subtitles look professional?
Break text into 3 to 5 word chunks, highlight one keyword per chunk, use a premium sans-serif font, add a semi-transparent background for contrast, and sync timing to speech rhythm. Save these settings as a template and apply to every video for consistent branding.
Do subtitles help with video SEO?
Yes. Subtitles provide text data that platforms can index and use for search and recommendation. On YouTube, captions improve discoverability through search. On Instagram and TikTok, caption presence is treated as a quality signal that influences algorithmic distribution.
Final Word
Adding subtitles to a video in 2026 takes minutes, not hours. AI handles the transcription. You handle the styling. That split is what makes the process fast without sacrificing quality.
The method matters. Platform auto-captions are fast but give you no control and no visual edge. Video editor captions are flexible but slow. Dedicated AI captioning tools hit the sweet spot: fast transcription with full styling control so your subtitles look professional and actually improve viewer retention.
Start with your next video. Generate AI subtitles, chunk the text into 3 to 5 word segments, highlight one keyword per chunk, and export with hardcoded captions. That workflow takes under 5 minutes and the difference in how your video looks and performs will be immediately visible.
For the fastest workflow with the deepest styling control, RenderCut handles AI transcription, word-level highlights, saved templates, and clean exports in one tool. No subscription. No watermark on the free plan. Try RenderCut free and add professional subtitles to your next video.
References
- Verizon Media - Research showing 80% of viewers watch videos to completion when captions are available
- ChatCut - 2026 subtitle workflow analysis: 70% of US viewers now watch with captions on
- Facebook for Business - Data on captioned video ads increasing view time by 12%
- Pixflow - AI automatic captions comparison across Premiere Pro, CapCut, and DaVinci Resolve (2026)